Ultrasound-guided central venous catheterization. Short-axis out-of-plane.
Short-axis out-of-plane technique
In this technique, the needle is inserted while observing the short axis of the vein; thus, the needle intersects the ultrasound image. It is mainly used for puncturing the IJV and FV. It is advantageous, because positional relationships with arteries are easy to identify, but its disadvantage is that it is difficult to know, where the needle is until it enters the beam plane of the ultrasound scan. In addition, distinguishing between the tip and the shaft of the needle by observing an ultrasound image can be difficult. Therefore, if the needle goes outside the scan plane and goes through the vein, the tip can possibly puncture an artery or the lung.
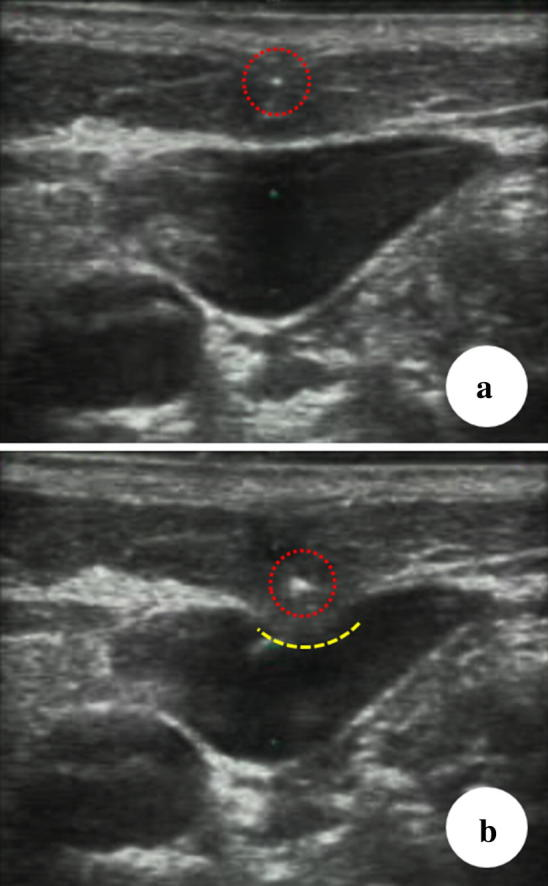
Figure 1 shows the difficulty in distinguishing between the tip and the shaft of a needle in an ultrasound image. In Fig. 1a, the needle tip (dotted red circle) is on the ultrasound beam. In Fig. 1b, the ultrasound image depicts part of the needle shaft (dotted red circle). The intensity of the shaft is greater than that of the tip in Fig. 1a, which makes it easy to make mistakes. A depression in the anterior wall of the vein (yellow dotted line) can be observed. This shows that the needle is outside the ultrasound beam plane and is touching the anterior wall.
If the puncture is performed only by confirming the vein’s short axis, there is a possibility that the puncture direction will differ from the path of the vein. This would cause the needle to penetrate the vein diagonally, which could lead to a mistaken puncture.
To make up for these disadvantages, perform a careful pre-scan to confirm the path of the vein and ensure the puncture follows this path. It is also important to constantly confirm the location of the needle while being inserted. It is important to understand that the needle tip is not recognized from its appearance, but that it is the first point of brightness to enter the ultrasound beam plane. As shown in Fig. 5, if a point of brightness is seen throughout the insertion of the needle, it is highly likely this is not the tip of the needle but the shaft.
Short-axis out-of-plane theory
Two types of scans need to be combined to grasp the path of the target vein.
First, a sweep scan is performed, in which the probe sweeps over the path of the vessel like a broom (about 2 cm). The probe should be manipulated so that the vein is always at the center of the ultrasound image


Combining these two scans ensures that the probe is completely perpendicular to the vein. Therefore, if the puncture is directed toward the center of the probe, the needle will advance toward the center of the vein (Fig. 4).

Fig 4: Probe placed perpendicular to the path of a vessel
It is important to confirm the location of the needle tip to ensure that the posterior wall is not penetrated (described above). In the short-axis out-of-plane technique, the vein intersects the scan plane; thus, the needle is guided into the ultrasound image. The needle tip is being confirmed intermittently in this method; thus, it is not strictly a real-time puncture. The position of the needle tip is not confirmed by depicting it in real time, but is based on theory (Fig 5)

Fig 5: Manipulation of the needle and confirmation of the tip. a When the needle is guided into the scan plane, b the first point of brightness to appear is the needle tip. c Next, the scan plane is moved slightly forward, which causes the point of brightness to disappear. d The needle is again advanced slowly into the scan plane, which causes a point of brightness to reappear. e Repeating this manipulation, the needle gradually reaches the target vein. f When the needle tip touches the anterior wall of the target vein, it creates a small dimple, turning the vein into a heart shape. Pushing the needle into the vein with a snapping motion allows it to move a short distance so that it only penetrates the anterior wall. (Venous pressure is normally low; thus, if the needle is pressed slowly into the anterior wall and the tip reaches the posterior wall, it could penetrate the posterior wall as well.) g Finally, the anterior wall returns to its original shape, the shaft comes into view, and the tip can no longer be seen. h To see the tip, move the scan line forward
SOURCE: Safety Committee of Japanese Society of Anesthesiologists